Sunday, November 11, 2012

How To Make a Crystal Necklace with Leather!


Hello my lovelies!
Well I was requested on tumblr to make a tutorial on how to make a crystal necklace with leather- so here you go! To note, there is so many ways you can make this, and I definitely plan on exploring it more! This was the first time I made a necklace like this myself!

So here is what you are going to need:

1. Scissors
2. Ruler
3. Small strip of deerskin
4. Leather cord
5. Needle nose jewelers pliers
6. A long crystal
7. Thick needle and waxed thread
8. 22 gauge wire (silver plated or brass is perfect)
9. Leather hole punch (optional)
10. Acrylic paint (silver) and a very small detail paintbrush


Step 1: Get your small strip of deerskin leather that wraps around your crystal. Now wrap that strip around the crystal to estimate the size you need. You want the strip to overlap a little so you can sew it. (Don't add wiggle room for the crystal, it needs to tightly go around it!) See picture-


Step 2: Now that you know how big or small the strip of leather needs to be, it's time to sew!
With your waxed thread, sew the leather together to form a circle. Cut off the tail of the thread!


Step 3: Pinch the leather circle on both sides, making the sewn line that you just made in the center of the circle. Then with your leather hole punch on the smallest hole setting, punch a hole. Then do the other side. Since you had the strip pinched in half, it makes two holes on both sides! (If you don't have a hole punch, gently make two on each side with your scissors.)


Step 4: Cut 2 strips (approx. 22 inches long each) of the leather cord. Grab one of the cords and thread it through one side of the holes. Leave about a 2 inch tail:


Now do the other side! It should look like this now:


Step 5: Now, wiggle the quartz into the leather circle-


Step 6- The Crystal should now have the strip of leather wrapped securely around it.


Now, cut a small strip of wire, about 3 inches long! Grab one side of the tail of the leather cord and the long leather cord, and wrap them together. On the ends of the wire make little curly q's and press them with your finger onto the leather.


Cut off the tails:


It should now look like this:


Step 7. Time to decorate! You have the option of doing further wire wrapping (around the center) or you could paint your design with acrylic paint! (Here is a quicky wire wrap around the crystal, but I had decided to paint it instead!)


Here is how mine turned out when I painted the center with silver ink:


Step 8. Just tie the necklace around your neck and you are done! Enjoy!


I hope you all enjoyed the tutorial! Don't be afraid to comment below, or leave me a message on my tumblr:
http://eirecrescent.tumblr.com/
and if you want to see more awesome tutorials go to my other tumblr:
 http://sacred-cottage.tumblr.com/

Bright Blessings,
~Brittany

Thursday, August 23, 2012

How to Make a Wand


Wand Tutorial!

Hi Guys!
So on tumblr I asked if you guys would like me to create a wand tutorial, and I received a resounding “YES!” So here you go! (*= optional)

Supplies you will need:
  1. Scissors
  2. Ruler
  3. Jewelers Needle Nose Pliers
  4. Tung Oil
  5. 20 Gauge Wire (brass or whatever wire color) and *22 Gauge Wire (this one is optional for extra wire wrapping)
  6. Stick/ Branch about .5 to 75 inches in diameter
  7. Cord (Leather or Hemp)
  8. Thin Cloth- (a cloth handkerchief is excellent for this, DO NOT GET a normal fuzzy cloth.)
  9. Quartz Crystal (about 1.5-2.5 inches long)
  10. *Beads (optional)
  11. Small sharp knife (or wood carving tools you can get at Hobby Lobby)
  12. *Small Hand saw (just in case you need to make your stick smaller)
  13. Fine Grain Sand Paper (a nail file works great for this- make sure it's unused though!)


    Instructions:
Step 1: First start out by finding the wood! (I use wood that has already fallen from the tree. Make sure the bark matches though so you know what tree it comes from! Because different woods have different magical properties, etc.) Don't forget to ask the tree if you can have it, and also it's nice to leave a small offering behind as thanks.
  1. Next, once you get home, begin to strip off the bark with a small sharp knife (or you can go to hobby lobby and get some wood carving tools- which I did.) Go with the grain, not across it.
  2. After all the bark is removed, gently sand the wood with fine grained sand paper. (Or a nail file) Make sure all sharp edges are smooth and filed down.
  3. If you want to draw out the woods natural color/shine rub/apply Tung oil to your clean cloth and very lightly rub into the he wood. (Don't use a lot, because it will take forever to dry.
    You can also use other wood finishes if you desire... Allow the wand to dry for at least a day. 
  4. When the wand is dry, it's time for the wire wrapping! Cut a strip of wire (approx. 40 inches long.)
  5. Then, fold the wire in half around the center of the crystal. Twist the two ends together around the stone.
  6. Begin to wire wrap downwards on the stone. (the picture is up side down). It's ok if the wire wrapping is loose, it will need to be later down the road when we weave the wire. 
  7. Once you reach the end of the stone, twist the wire straight down like 5-10 times. This creates a little tail that helps attach the stone to the wood. 
  8. Continue wire wrapping exactly how you did to the crystal but this time onto the wood for about 2 inches into the wood. 
  9. Now, it's time to go back up! Start wire wrapping upwards (toward the crystal)! 

  10. Once you reach the crystal, get the closest wire to you and wrap it around the lowest wire of the crystal. (make 2 loops around the wire.) This technique is how you will STABALIZE the crystal in place. 
  11. Continue moving in a zig-zag ( almost clock wise around ) pattern with the same wire, move across the base of the crystal until you are almost out of wire (leave about a 2-3 inches- this will turn into your curly-q). 
  12. With the other (second) long piece of wire that was left dangling, begin tucking the wire and weaving in in a zig-zag like pattern (counter clock wise). This is so you can wire wrap the back of the crystal. (When you are done, leave a 2-3 inch tail)
  13. With the tails create a spiral from each, and move it towards the center of the stone! Since the stone is gong to be loose, create little lightning bolt shapes with your needle nose pliers to tighten the wire around the crystal. 
  1. *OPTIONAL STEP* if you want to add beads on your wand, with your 22 gauge wire (a strip about 20 inches long) wire wrap down the wand. Each time you wrap, string a bead, the pull the two ends together and twist. Keep doing this until you are satisfied. On the last twist around the wand, create spirals and pull it around the wand for a finished look.

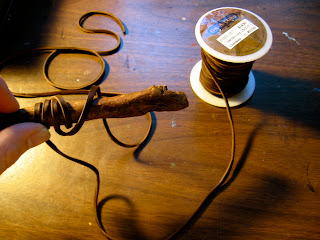
  2. The hardest part is now done!! Now, time to create the handle! Get your leather cord or hemp and cut about 70 inch strip. (if it's a really thin cord). Gather the cord and leave a 5 inches to dangle. Then, with the longer end, start about 3-4 inches from the end, begin wrapping the cord downwards (away from the crystal.) Make sure the wrap is tight. 
  1. Once you reach the end of the wand, still with the longer end of the cord, move upwards, in a large spiraling motion and meet the 5 inch dangly strip, and tie them together in a knot. (At this point you can cut the excess ends or do the next step.)
  2. *Optional Step- With the two dangly ends of the cord, you can string beads and feathers onto it!
Congratulations you have now a completed wand!

I apologize for the crappy photo's but you should get the gist of things! So tell me what you think by commenting down below! If there is something I did not address,  let me know!

Bright Blessings,
~Brittany

Wednesday, June 27, 2012

Creating an Altar


Altars are as unique as a person is. They reflect our spirituality, personality and mental state. It can become our sacred space where we leave the mundane behind to create something magical. But it also is an important place of worship for our Gods as well as our Ancestors.

So how to create one? Like I stated before, altars are very individual but here are several common features of modern Pagan ones:

- Figurines or Art- representations your patron deities, ancestors, etc.
- Spell Book or Spiritual Journal- other names depending on your path are: Book of Shadows, Grimoires, etc.
-  Elemental Representations: like Candles (for fire), Feathers (for air), Shells (for water), Soil (for earth).
- Wand- this can be made of anything, mine for instance is made of a long white antler tip with a quartz on the end. The point is that the wand is used to focus and channel your energy.
-Crystals- these are used in spell work by enhancing it; giving your energy a boost or grounding yourself.
-Divination tools-  such as: Tarot cards, scrying bowls, crystal ball, scrying mirror, ogham staves, runes, rods,  pendulums, etc.
-A Small Cauldron- great for spell work of all types where you need to burn things. Also it can be used as a scrying bowl.
-Chalice or Drinking Horn-  used symbolically or ritualistically, used to toast to the Gods etc.
-Incense or smudge stick- Used to cleanse/ purify your sacred space. Incense can also be used as a divination tool or aid.
-Offerings-  this can include anything you deem to be fit to give your deities. I happen to use different herbs as my offerings, but you can use food products, handmade gifts etc.
-Altar Cloth- a great item to liven up your altar, which also can have practical uses.

Now where in the world are you going to find this stuff- especially when your'e on a budget? A lot of the items on your altar you'll find are handmade by yourself- like your spell books/ journals, wands, offerings, and some divination tools. But what about Cauldrons? Chalices? Altar Cloths, etc? Well, a lot of the things I mentioned can be found out Garage sales. I have found sooo much stuff while out and about that work as great ritual items! Also check thrift stores and consignment shops,  a local shop of mine that sells mostly consignment clothing has some home items and I found a great mortar and pestle there! Check GoodWill as well,  I have found dozens upon dozens of cauldrons there. The one I currently use is actually from there! As for an altar cloth, you can use scarves or tapestries!
Next, CHECK YOUR PARENTS KITCHEN. You would not believe the stuff that you'll find there, like old glass goblets that can be used as a ritual item. Also you can find great small offering plates! All of which were tucked away in the back of a cabinet. Just don't forget to ask if you can have them!

But, hey, what if your thinking: "I want an altar, but I'm still in the broom closet!!! What should I do????GAHHH!"
Well here is what you can do, as much as it is a hassle to do, you can get a large old wooden travel trunk to hold all your altar supplies. Then, when you need to do a ritual or just meditate you can set it all up on the top of the trunk like a table. When you are finished, just place the items back inside and slide the trunk under your bed. Another option is that you can set up a small altar in the corner of your closet. This way it is out of sight, but you can still have it permanently set up.

So I hoped I helped some, and if there is something that I missed that you would like me to address, leave me a comment below!

Bright Blessings,
~Brittany

P.S. The picture above is a photo of  my own Altar! :D


Monday, February 20, 2012

Craft Alert! Making Divination Tools

Greetings my Witchy and Pagan friends!
This latest entry is all about creating Divination tools! There are so many tools that you can create, but I'm only going to address a few. You will learn how to create scrying mirrors, quicky scrying bowls, pendulums and pendulum boards and Norse runes. Since this will be a long entry, there will be a second post that I will make next week. That will be about creating your own unique oracle set and divination with different colored gemstones.
Now to get crafting!

1. Scrying Mirror-
Supplies you *need*:
  • Picture frame (preferably wood) with the glass inside
  • Black Acrylic Paint
  • Wide paint brush 
  • newspaper/paper towel
  • Sheet protector to use as a palate (or just use a paint palate)


Steps:
1. First get your empty picture frame and take off the back so you can get to the glass. Once off, throughly wash the glass so it is perfectly clean of any dust.
2. Lay newspaper or a paper towel down, then place the glass on top. This is so you don't get black paint everywhere. Get your black paint and pour out a little on your sheet protector or palate.


3. In one direction begin to apply the paint on to the glass. Be very careful to apply evenly- don't glob it on!


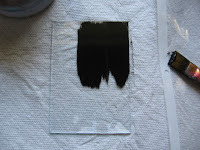
4. Once the first is put on, wait about 10 min to air dry. Once dry it may seem like the black paint is perfectly put on and didn't streak, the best ways to check if you have missed any spots on the glass is to hold it up to the light!
5. If you have streaks (like in the picture) apply a second thin coat of black paint. Wait 10 min to dry (or until it's perfectly dry and you don't see any wet spots.)

6. Super carefully not to scratch the painted back, place the non painted side face down onto the picture frame and reassemble everything. You're done!

EXTRA DETAILS for the mirror:
7. To make your mirror a little extra special, on the frame you can paint crescent moons, or wood burnish the out side with magical symbols!

2. Quicky Scrying Bowl

Supplies:
  • shallow wooden bowl (you can usually find these at thrift stores or goodwill if you don't have one on hand.)
  • wood burning tool (aka pyrography tool that you can find at any craft store. They are around $12)
  • Silver Paint
  • Fine (thin) paint brush 
Steps:

Preparation-> If you have bought the wooden bowl from a thrift shop, you need to throughly wash it with a anti bacteria soap.
1. With the bowl and begin to draw lightly with pencil of your desired design. I prefer to draw on it free hand but you can use a stencil. Have your wood burnisher on and heating up- make sure the tip is not touching anything so you wont catch something on fire.

2. Once the wood burnisher is sufficiently hot begin to trace your design on the wood.
3. Once completed burnishing, trace the design below it in silver paint!


5. Wait for it to dry and you are done! See, wasn't that quick! :)

3. Pendulums
Supplies:


Option A: Natural Pendulum-

  • Shell (or you can use a raw crystal, holey rock, etc... )
  • a small wood or ceramic bead for the end of the pendulum
  • 12 inch leather chord
  •  20 gauge brass wire (about 15 inches or so)
  • scissors and needle nose jewelry pliers


Option B- Chain and Crystal Pendulum
  • Quartz Crystal (any crystal will work)
  • 10 inch brass cable chain
  • 10 inches of brass 20 gauge wire 
  • 2 small jump rings
  • A small sparkly bead (for the end of the pendulum)
  • Head pins for beads (or you can just use the wire)
  • scissors


Pendulum A steps:
1. Starting with your pre-cut wire begin wire wrapping from the top of shell (the point is facing downwards). You need to create a loop so that the leather cord can go through this loop. (When you are wire wrapping, treat it like you would be creating a pendant, if that makes sense.)
2. Once the shell (or crystal etc.) has been wire wrapped, tie one end of the chord through the top loop of the shell several times.

3. Now at the other end of the leather chord, slide your wood bead or ceramic bead on and then tie the end! 
4. Congrats your done!


Pendulum B steps:
1. Starting with your pre-cut wire, begin wire wrapping from the top of crystal (the point is facing downwards). You need to create a loop so that the jump ring can go through it. (When you are wire wrapping, treat it like you would be creating a pendant, if that makes sense.)

2. Open the jump ring with your needle nose pliers and place the wire wrapped stone on it. Then with your 10 inch cable chain, slide the last link onto the jump ring too. Close the jump ring tightly.


3. Now with your head pin (see below for what these look like) or with your wire, slide a sparkly crystal bead onto it. The create a loop at the end of that. Next get your other jump ring, open it up with needle nose pliers, and slide the last link of the chain onto it. After that, slide the crystals head pin loop onto the jump ring. Close the jump ring tight.  (Example below- a bead with a head pin on it)
4. You're done!
It should look like this:
4. Pendelum Board
Supplies:
  • A smooth, cut piece of wood. (In the picture is a 5"X5" wood square that you can get at Michaels or any craft store.)
  • Wood burnishing tool
  • Pencil
Steps:
1. On the wood piece, draw on your design. I chose to do a pentacle :) At the top and bottom, write the word "Yes." To the right and left of your design, right the word "No." Then in the in-between areas write "Maybe." The reason behind writing all this stuff is that when the pendulum is swinging, you know what the answer to your question was. *As you draw, have your wood burnisher heating up*
2. Once sufficiently hot, trace your wood burnisher over the design over the sketch. Feel free to embellish as you go!


3. You're done!

5. Norse Elder Futhark Runes

Supplies:

Steps
1. One gather your rocks from a river if you can, I say this because they are super flat and smooth and perfect to work on.
2. One by one, with your silver paint (on the sheet protector palate), begin painting each rune on the rock. As you do this, meditate on the symbols meaning. 


3. Ta da, that's it!
----------------------------------------------------------

Well everyone, I appreciate you  guys reading and I can't wait for the second part of this post. It will definitely be more fun and creative!

So what do you guys think so far!?! Comment below! :D

Goodnight!
~Brittany