
Wand Tutorial!
Hi Guys!
So on tumblr I asked if you guys would
like me to create a wand tutorial, and I received a resounding “YES!”
So here you go! (*= optional)
Supplies you will need:
- Scissors
- Ruler
- Jewelers Needle Nose Pliers
- Tung Oil
- 20 Gauge Wire (brass or whatever wire color) and *22 Gauge Wire (this one is optional for extra wire wrapping)
- Stick/ Branch about .5 to 75 inches in diameter
- Cord (Leather or Hemp)
- Thin Cloth- (a cloth handkerchief is excellent for this, DO NOT GET a normal fuzzy cloth.)
- Quartz Crystal (about 1.5-2.5 inches long)
- *Beads (optional)
- Small sharp knife (or wood carving tools you can get at Hobby Lobby)
- *Small Hand saw (just in case you need to make your stick smaller)
- Fine Grain Sand Paper (a nail file works great for this- make sure it's unused though!)

 Instructions:


Step 1: First start out by finding
the wood! (I use wood that has already fallen from the tree. Make
sure the bark matches though so you know what tree it comes from!
Because different woods have different magical properties, etc.)
Don't forget to ask the tree if you can have it, and also it's nice
to leave a small offering behind as thanks.
- Next, once you get home, begin to strip off the bark with a small sharp knife (or you can go to hobby lobby and get some wood carving tools- which I did.) Go with the grain, not across it.

- After all the bark is removed, gently sand the wood with fine grained sand paper. (Or a nail file) Make sure all sharp edges are smooth and filed down.

- If you want to draw out the woods natural color/shine rub/apply Tung oil to your clean cloth and very lightly rub into the he wood. (Don't use a lot, because it will take forever to dry.You can also use other wood finishes if you desire... Allow the wand to dry for at least a day.

- When the wand is dry, it's time for the wire wrapping! Cut a strip of wire (approx. 40 inches long.)
- Then, fold the wire in half around the center of the crystal. Twist the two ends together around the stone.

- Begin to wire wrap downwards on the stone. (the picture is up side down). It's ok if the wire wrapping is loose, it will need to be later down the road when we weave the wire.

- Once you reach the end of the stone, twist the wire straight down like 5-10 times. This creates a little tail that helps attach the stone to the wood.

- Continue wire wrapping exactly how you did to the crystal but this time onto the wood for about 2 inches into the wood.


- Now, it's time to go back up! Start wire wrapping upwards (toward the crystal)!


- Once you reach the crystal, get the closest wire to you and wrap it around the lowest wire of the crystal. (make 2 loops around the wire.) This technique is how you will STABALIZE the crystal in place.

- Continue moving in a zig-zag ( almost clock wise around ) pattern with the same wire, move across the base of the crystal until you are almost out of wire (leave about a 2-3 inches- this will turn into your curly-q).

- With the other (second) long piece of wire that was left dangling, begin tucking the wire and weaving in in a zig-zag like pattern (counter clock wise). This is so you can wire wrap the back of the crystal. (When you are done, leave a 2-3 inch tail)

- With the tails create a spiral from each, and move it towards the center of the stone! Since the stone is gong to be loose, create little lightning bolt shapes with your needle nose pliers to tighten the wire around the crystal.


- *OPTIONAL STEP* if you want to add beads on your wand, with your 22 gauge wire (a strip about 20 inches long) wire wrap down the wand. Each time you wrap, string a bead, the pull the two ends together and twist. Keep doing this until you are satisfied. On the last twist around the wand, create spirals and pull it around the wand for a finished look.
- The hardest part is now done!! Now, time to create the handle! Get your leather cord or hemp and cut about 70 inch strip. (if it's a really thin cord). Gather the cord and leave a 5 inches to dangle. Then, with the longer end, start about 3-4 inches from the end, begin wrapping the cord downwards (away from the crystal.) Make sure the wrap is tight.
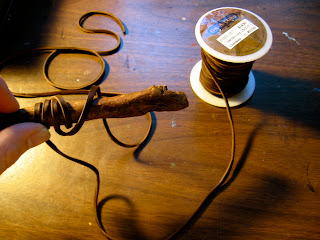

- Once you reach the end of the wand, still with the longer end of the cord, move upwards, in a large spiraling motion and meet the 5 inch dangly strip, and tie them together in a knot. (At this point you can cut the excess ends or do the next step.)

- *Optional Step- With the two dangly ends of the cord, you can string beads and feathers onto it!

Congratulations you have now a
completed wand!
I apologize for the crappy photo's but you should get the gist of things! So tell me what you think by commenting down below! If there is something I did not address, let me know!
Bright Blessings,
~Brittany
Great tutorial. :)
ReplyDeleteThank you so much! :D
ReplyDeleteWhat great instructions! They seem very clear and easy to follow. Attaching the crystal seems like the hardest part. I'm wondering if my clumsy fingers can do it...lol I'm inspired to try!
ReplyDeleteThank you for taking the time to write these up and share them.
Hi Karen!
ReplyDeleteAttaching the crystal really is the hardest part! If your not used to it, prepare to do it several times! Don't give up though!!
No problem, and thanks for commenting!
Cheers,
~Brittany
Hi Karen, can u use drift wood? my goddess is yemaya of the sea. So I thought it may be good having one that came from her so to speak.
ReplyDeleteThanks Krista.xxx
love this tutorial it explains it so well, fab blog you have, blessings, Alison http://www.astartemoonblog.com/
ReplyDeleteThank you! You've inspired me to make my own crystal wand, which I've featured on my blog: http://magicalgemstones.blogspot.com/. Thank you, thank you, thank you!
ReplyDeleteThank you! I made a wand of my own and posted it on my blog, http://magicalgemstones.blogspot.com/. Thank you, thank you, thank you!
ReplyDeleteGreat! Exactly what I have been looking for :)
ReplyDeleteThanks so much for sharing this, it is one of the best guides I have seen. I can't wait to get my supplies; I already have one of my favorite crystals picked out.
ReplyDeleteGreat tutorial, can't wait to try making mine! Quick Q: In the first pic, the want has runes on it, what did you use to paint them?
ReplyDeleteBB )O(
Where do you find crystals such as these? I can never find them no matter where I look! I guess I'm just really a beginner. Btw, these are all so beautiful!
ReplyDeleteGreat tutorial loved it I was looking for this and your popped up Iam glad I found your blog. You inspire many people as well as me . Thank you so much blessed be
ReplyDeleteIam so glad I found your blog your an inspiration to many as well as me . Bright blessing sister
ReplyDeleteI like the idea of wire wrapping the crystal rather than gluing it on line I've seen some store owners on etsy do... Wire wrapping seems much more durable for some reason.
ReplyDeletethat was great..thank you
ReplyDeleteMysteria Windsinger
Thank you for guiding my creation with such simple instruction!!! Blessed Be.
ReplyDelete